
It is more often that the walls adjacent to the stern and stiff surfaces, especially floor tiles and wood, have some cracks. We use baseboards there.
How to cut baseboards without miter saw is a technique that I’ll discuss in detail in this blog.
Baseboard is a trim used to conceal the uneven, cracked joints between the wall and the floor.
The baseboard is a length of wood or plastic-mounted coverings to areas between the wall and the floor base.
Better than carpet and drywalls, it also protects partitions from the more damage.
Installing the baseboard around the house is always a better option, and the miter saw is often used to do this task. The Miter Saw will allow you to cut the wood into straight length.
By this, you can cut the wood as you want. Another use of a Miter Saw is that it can cut the wood from different angles.
If you have a desire to cut the wood in 45 degrees or some other tip, then this saw can easily confirm your cutting and can make it fast for you.
A miter saw is the best method if you want to cut baseboard corners. Still, if you are going to cut their edges and miter saw is unavailable, you don’t worry because the steps to cut base board corners without miter saw have been discussed impressively.
It is straight forward, and it will require your minimum effort.
Nevertheless, there is an illustration to accomplish this correctly so that your baseboards’ profile concerning the joints’ alignment and the baseboards’ angle is positioned vertically on your floor and walls.
You can use many techniques, and each of them needs a different tool for cutting edge molding, whether it is your usual baseboards or crown moldings.
Elements Of Baseboard Corners
Hardwood
If you can search the baseboard production firms, you will come to know that most of the companies are using hardwoods and producing it.
They will be operating alongside mahogany, maple, or oak. Some of the other firms use pine. These are processed in huge numbers and known as ‘farms’.
It is usually 96 inches in length, and it has a width of between 2-3 creeps. Some more special effects add that it is with embellishment and a stack that can appear and looks good.
During installation, the first molded parts are introduced on edge, while another part is placed to create shadow lines.
Vinyl
Vinyl is often a white shading and shape, yet has the main benefit of its flexibility. Being flexible as a baseboard is a big plus.
It can be framed to the walls that don’t have the squared corners. Vinyl is flexible; It is the reason it can be fit in the corners of the non-square walls.
It holds firm on the wall and it does not break or crack. As compared to the wooden embellishment, it twists.
Another advantage is that it is easy to cut. You can cut it by any saw, either it is miter saw or any other.
It is moderate for two reasons: there are no imperfections and you can use every inch of it because of its consistency.
Vinyl shaping is accessible in all profiles in which standard wood forming is available.
Composites
Composites holdings are somewhat the same as the vinyl in some sort, but they twist effortlessly more than a wood, but they can not twist as much as the vinyl.
Composites have a thick particleboard center. They have a vinyl covering. As the composites cant be retooled, so they are colored or white.
A complete white makes them look transparent. In comparison to vinyl, they give much more assurance.
They can be cut and can be mitered the same as the wood. They are considered as the most reasonable and perfects for use.
How To Straight And Miter Cut
Below are all the steps that make a miter cut using baseboard or crown molding using a jigsaw.
- Use a tape measure to measure the plinth from one end to the cutting point. Mark the cutting point with a pencil. Use a speed square to mark the cutting line.
- Please pick up the jigsaw (with the right blade attached) and position it to be on your cutting line’s waste side. The shoe should rest flat on the baseboard. Make sure the plinth is attached, but with enough space for the benchtop or floor.
- Kindly turn on the switch and let the jigsaw reach its maximum speed. Place it slowly on the plinth. Guide the blade until you finalize the cut. Optionally, you can guide the shoe with a speed square.
How To Cut Coped Joints
Now we will discuss how we can cut the coped joints. The method is quite difficult compared to a straight miter but can still be a better fit for the cut.
A plinth(Baseboard) serves as a half-corner, which fits flat against the wall, without bevel, and the jigsaw is the perfect tool for this cut.
Below are the steps to cut a coped joint
- First of all, you need to cut the plinth lengthwise. It would be better to use a bevel cut so that it exposes the grain end of the plinth. In this way, the jigsaw has more working equipment.
- After that, you need to make a back cut using the jigsaw, next to the decorative plinth curve.
- Then make sure that the workpiece is securely fastened to a bench.
- Make a 45-degree curved angle with the jigsaw toward the back of the baseboard along its surface.
- Use sandpaper to finish or file the baseboard. Make sure the other corner is also suitable. Make sure the socket on the back cut fits the face of the other side of your baseboard.
- Now take some help of nails and glue to attach and secure the baseboard.
- Finally, add paint and caulk around any slight gaps or joints if necessary.
How To Cut A Scarf Joint
A scarf joint is like a coped corner because it mixes two baseboard pieces to expand them. It is also done for better fitting if it is a little more complicated than the previous methods.
Below are the steps to cut a Scarf Joint
- Make two opposite bevel cuts on two pieces of the plinth that you will merge. These cuts can be at angles of 45 or 22.5 degrees in opposite directions. Set the shoe of your jigsaw to the right angle and cut it.
- Now plan so that the joints flap a wall beam. By this, you can nail both sides for good care.
- Now take some glue and nails to install the baseboard on the wall.
- Apply the block to the seams and let the joint set. It is important to let any joints set to prevent extension
- Now give the finishing touch to the baseboard with paint so that it looks good.
How To Cut Baseboard Corners Without Miter Saw – Follow These 7 Simple Steps
If you are unaware of cutting the baseboard corners without the miter saw, follow these seven steps guide, and you will do that correctly.
There is no doubt that the art behind the baseboards’ crowning requires some accurate and precise cutting on specified angles.
However, we all know that the miter saw is the most reasonable option, but if you do not have the miter then what?
Not having a miter saw does not mean that you cannot cut or mold baseboards’ corners.
Its a knowledge of interest that the other methods are cheaper than cutting a baseboard with a miter saw.
So I have gathered a very affordable and easy way for you people to cut the baseboard without a miter saw.
Below are the steps to Cut Baseboard Corners without Miter Saw
* Stuff that you need for this are
- Glue
- Screwdriver
- Screws for wood.
- Woodcutter’s square
- An adjustable bevel.
- 1×4 and 1×6 lumber.
Gather them before start applying the steps.
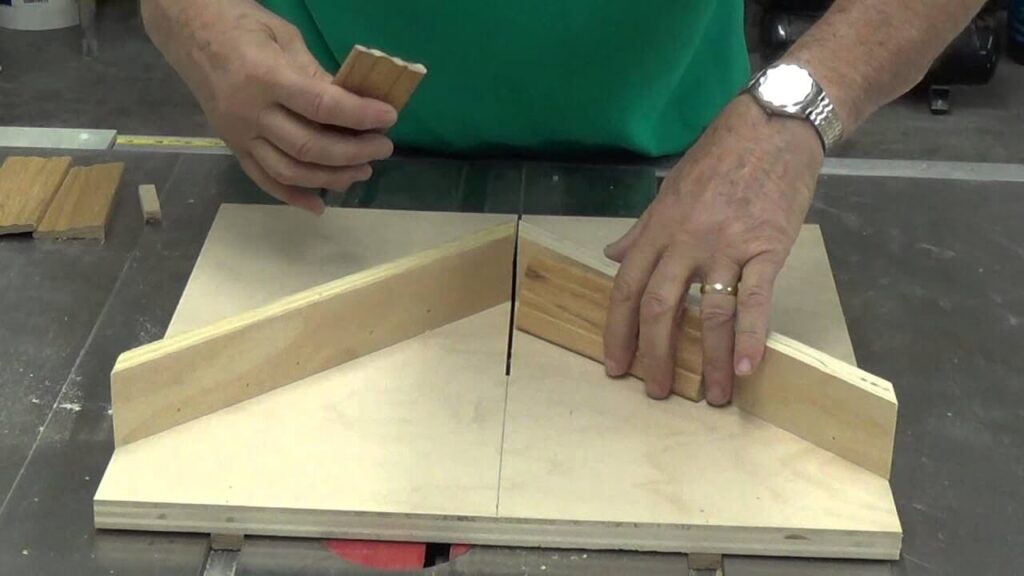
⦁ Cut the 1×4 and 1×6 lumber into two 12-inches pieces. Preferably use the straight wood.
⦁ Now apply the glue according to the length on the corners. Now keep it flat on the table. 1×6 lumber should be placed upright against the edge.
⦁ Using a screwdriver, join the 1 × 6 and 1 × 4 lumber together using the half-inch screws. At the end of this step, you will get an open 4-inch box.
⦁ To mark the edges of both sides of the box, measure the angle at 45 degrees with a bevel.
⦁ Then draw a perpendicular line on the outside of the box with a Carpenter’s square, starting from the angular line’s to the lower end of the makeshift box.
⦁ Sign the hand saw according to the angular marks on the box and cut from top to bottom across the sides, placing the saw perpendicular to the box’s touchlines.
⦁ To cut corners, place the baseboard against them and use the marks on the baseboard to determine the box grooves. The hand saw must be inside the groove to cut the corners of the plinth. However, if you find this process difficult, you can use a tabbed box as an alternative.
Conclusion
It is the correct and precise cut molding, whether it is a standard baseboard or crown molding. After reading this article now, you are sure that cutting a baseboard can be possible without the miter saw.
It is also the easiest way to cut it. Other tools, like hand saw can also make a miter box, but it is challenging and time-consuming.